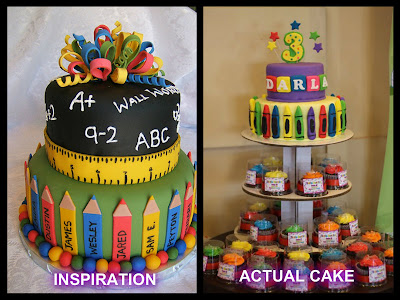
Get your inspiration and do your own version!
A great party doesn't always have to be expensive. You can add little details that would make it more personalized. As an example, I will be showing you what I did for my youngest daughter's birthday party.
When it comes to party styling, it would help if you have a specific theme. For this party, we chose a generic theme, crayons. This theme is very close to my daughter's heart because at this stage, she is particularly fond of colors and identifying them.
So, I started doing research on the internet, looking for visual pegs and ideas. I started collecting images and thought of ways to incorporate them in our theme. I'm placing those inspiration pieces side-by-side with the actual execution we did for the party.
CAKE
I wanted a simple one-layer cake to stand on top of a cupcake tower. But when I saw a picture of a 2-layer cake on the net, I immediately wanted the same. Incorporating designs from other cake pegs, like the name block and the number topper, I made my own design and gave it to the cake-maker. In the end, I was happy with what we got. We had a 2-layer cake on top of our cupcake tower.
Back to the drawing board
Here's a tip, when in doubt, sketch! I don't bake but I know some very reliable cake makers. However, being the control-freak that I am, I make sure that my suppliers get my vision. And what better way to explain than through a drawing. See?
PARTY GIVEAWAYS
The party giveaways were the hardest to look for. There are a lot of nice crayon-themed giveaways, but most of them are not available in the Philippines. I was set on having the crayon pillow and I found a local manufacturer, problem is that they wouldn't take my order since my deadline was a bit tight. Solution: I sourced the raw materials myself and had my aunt sew the pieces together, and ...voila!!! The finished product was even better than I imagined.
CANDY BUFFET
We had a fastfood birthday party and I wanted to make it more special by adding crayon details and a special highlight... a candy buffet. I found lots of inspirations on the internet but I was going for a "colorful but organized and dainty" look. I think I was able to achieve that with my DIY candy buffet. By the way, I was tempted to get a supplier for this but I found out that I can cut the cost in half if I did it myself. So, here you go...
NAME DECOR
I chanced upon this letter decor while I was browsing through images of candy buffet. I thought it would be a nice touch to the candy buffet so I incorporated it to the design.
TABLE DECOR - Crayons in Jar
I thought of having table centerpieces that still carried the theme but most of what I saw online were difficult to make and at that point I had very little time to prepare. Then I saw this jar full of crayons and I thought of using it as a table centerpiece and it could double as a craft activity for the kids while waiting for the party to start. So, I placed one short drinking glass on each of the tables and filled them with crayons alongside pieces of coloring pages of famous cartoons (Dora, Barney, Mickey Mouse etc.) It was a hit!
If you're planning for a kiddie party, here are my tips:
1. THEME- think of one, decide on it and stick to it. You'll find that your preparation is easier if you already have a theme in mind.
2. RESEARCH - You'll find a goldmine of ideas on the internet. So, google away!
3. Whenever you can, DO IT YOURSELF - it may take some time and effort but you'll find out that you will save a lot of money if you DIY things, and it's so much more fulfilling than paying somebody else to do it.
4. Consider TIME - choose concepts and ideas that can be executed according to your time frame.
5. EDIT YOURSELF - a tip not just for writers but for all creative minds out there, especially mothers! Sometimes we get too excited with our ideas that we end up with more than we can actually handle.


